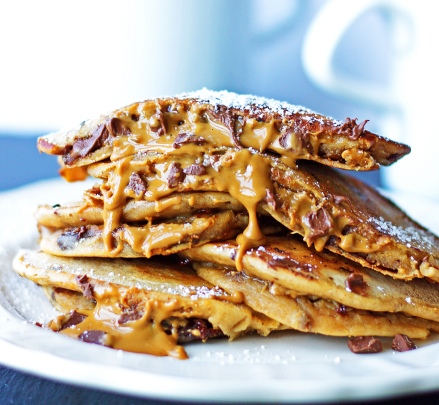
Cookie Dough Stuffed Pancakes

A few weeks ago, I went to a cafe in Woodbury, Minn. and ordered one of their signature plates, chocolate chip cookie dough pancakes. Now I am a HUGE breakfast fan, but these pancakes took breakfast to a whole new level. I fell in love and I haven’t stopped thinking about them since.

I found this recipe on Pinterest and I can’t wait to give them a try! Let me know what you think.


ChocolateChip-Cookie-Butter-Pancakes-Better1.jpg
Prep Time: 15 minutes | Cook Time: 10 minutes | Yield: 8 pancakes depending on size

Cookie Dough Stuffed Pancakes {Indulgent & Healthy!}

Chocolate Chip Cookie Dough Stuffed pancakes that are so indulgent you’ll never know they are healthy! Also includes a bonus gluten free recipe option!

Ingredients

Pancakes
⅔ cup almond flour
2 tablespoons arrowroot flour
2 tablespoons tapioca flour
1 tablespoon coconut sugar
½ teaspoon baking powder
2 pasture-rasied eggs
¼ cup cashew milk (or almond milk)
½ teaspoon vanilla
1 tablespoon coconut oil, melted
½ teaspoon cinnamon
dash of salt
1 teaspoon of grass-fed butter, ghee or oil of choice for pan

Cookie Dough Middle
½ cup of natural cashew butter or almond butter
¼ teaspoon cinnamon
2-3 teaspoons coconut sugar
¼ teaspoon vanilla extract
2 ½ tablespoons of dark chocolate chips, chopped (Enjoy Life Brand)

To make cookie dough:

-Combine the nut butter, cinnamon, sugar, vanilla, and chopped chocolate chips, and mix well. You may need to soften the nut butter slightly (microwave a few seconds) depending on the consistency. Or if your nut butter is particularly thick you can add a little melted coconut oil as well.
-Line a cookie sheet with parchment.
-Smear 1 tablespoon of cookie dough with a spoon, making a flat disk. You should have about 8.
-Place in the freezer to set while you make the batter!

To make the pancakes:
-Wisk together the dry ingredients: flour, coconut sugar, cinnamon, baking powder, and salt.
-Make a well in the center and add egg, luke warm almond milk, and melted coconut oil.
-Wisk all the ingredients together, it may be thick and a little clumpy, which is fine, but do not over mix the batter.
-Heat a nonstick skillet over medium-high heat, and add a touch of coconut oil (or coconut oil spray).
-Remove cookie dough disks from the freezer and remove them from the parchment paper.
-Laddle pancake batter in the skillet (turn temp down to medium- no oil smoking!).
-Allow pancake to set and you will see bubbles rising and the pancake with cook through (no wet batter). (*or for the lazy version make two pancakes and layer the cookie dough in between-it will melt between the pancakes, they just will not be officially “stuffed.”)
-Check the bottom of the pancake to make sure it is not burning, if so, turn temp down.
-Once there is no runny batter on the top, place a cookie dough disk on top and laddle just enough pancake batter to cover the disk, then flip pancake and finish cooking.
I-f you pancakes are too thick and not cooking through, dilute the batter further with additional almond milk.

Here are the basic steps to stuff your pancakes:

1. Combine your dry ingredients. Make a well in the middle and add wet ingredients. Mix, but do not over mix!
2. Smear the cookie dough on a parchment-lined cookie sheet and stick in the freezer.
3. Once the pancake is cooked most of the way through, add your frozen cookie dough disk, cover with pancake batter, and flip!
 

The Easiest and Tastiest Smoothie

Looking for a fresh start to your day that tastes fantastic? Try this simple recipe I have been using to kick-start your morning.

fruit-smoothie.jpg
Makes 2-4 Servings
Ingredients: 

-2 cups frozen berries like strawberries, blueberries, blackberries–these berries give you energy or whatever you prefer. (If you use fresh berries, add some ice as well).
-2 cups Orange Juice
-1 cup low fat vanilla yogurt (or yogurt of your choice)
-1 Banana
-A few (or a lot if you like it) leaves of spinach–I don’t enjoy much spinach but with a few leaves–you know it’s in there but don’t notice it
Optional: Protein powder (great bonus if you are only having a smoothie for breakfast-helps with hunger).

Directions:

1.) Place liquid ingredients into blender first (I use the Ninja blender), then add the rest of the remaining ingredients.
2.) Blend on high for 2 minutes or until smooth. *You may need to scrape some ingredients from the sides and blend again to get them all blended in.
3.) Serve and enjoy

Chicken, Spinach and Tomato Skillet

The other day I made this skillet–and it was fantastic. I am not a spinach fan by any means, but I feel this recipe is perfect for those that want something healthy but don’t particularly enjoy spinach. Sauteed Chicken Spinach Tomatoes_1007x545.jpg

Serves: 6 Prep time: 5 minutes Cooking time: 25 minutes
Ingredients: 

-2 Tbsp canola oil
-1 1/2 lbs chicken tenderloins (you can use frozen–thaw first or thawed)
-1 clove of garlic (or 1 tsp canned minced garlic)
-1 large fresh tomato or 1 can (14.5 oz) can of diced tomatoes (drained)
-1 tsp pepper
-1 tsp Seasoned Salt
-1/2 tsp garlic powder
-1 package (6 ounces) baby spinach leaves

Directions:

  • Heat oven to 350 degrees.
  • Heat oil in large skillet on medium heat. Add garlic and saute for 2 minutes.
  • While the garlic is cooking, place thawed chicken in the oven for 10-15 minutes until golden brown and inside is completely cooked.
  • Add tomatoes and baby spinach leaves and seasoning to the skillet. Turn the heat to low, cover and let simmer for 4-5 minutes (or until heated through)-stirring occasionally. The spinach will wilt.
  • When the chicken is done, pour the spinach and tomato mixture on top the chicken and enjoy.
Comparable recipe can be found here.
Nutrition information (Amount per serving)
  • Calories: 220
  • Cholesterol: 73mg
  • Sodium: 431mg
  • Protein: 28g
  • Total Fat: 8g
  • Fiber: 3g
  • Carbohydrate: 9g

Are You Cooking With The Right Oil?

There are many different types of oils out there, and many people don’t realise that some are better suited for certain cooking methods than others. Today, I am focusing on some of the more common or ‘healthier’ oils and highlighting some of the pros and cons of each:

Olive Oil

Pros

  • OIive oil is considered as a ‘heart healthy’ oil as it helps to raise good (HDL) cholesterol and lower (LDL) bad cholesterol.
  • This type of oil is best suited to cold dishes and salad dressings as it doesn’t do too well being cooked over a high heat. My favourite salad dressing in the world is extra virgin olive oil mixed with lemon juice OR balsamic vinegar. I am of Greek heritage and this is very traditional.
  • If you are unsure which type of olive oil to buy, I would recommend extra virgin olive oil as it has a higher amount of antioxidants and I think it tastes better too.

Cons

  • Olive oil can go rancid (‘off’) quite easily so it is best to store in a cool, dark place.
  • As I mentioned previously, this oil is not suited for high temperature cooking as it breaks down when heated at high temperatures, which creates unhealthy trans fats. If you plan to cook with olive oil, I recommend using it only at a low heat.

Coconut Oil

Pros

  • This is one of my favourite oils, but not necessarily just for food. Coconut oil is also a great moisturiser and hair treatment!
  • Coconut oil is rich in lauric acid, which is a special type of fatty acid believed to improve cholesterol.
  • It is great in meals that require cooking over low to medium temperatures, such as soups, stews, curries, baking, and raw desserts.
  • Can be stored within your cupboards for months without going ‘off’.
  • Definitely a great variant to other typical oils if you want to use it a few times per week.

Cons

  • Coconut oil is very calorie dense, and has a higher saturated fat content in comparison to other oils.
  • It also has a very distinct flavor, which can alter the taste of the overall dish.


Canola Oil

Pros

  • In comparison to other cooking oils, canola oil is lower in saturated fat.
  • It also contains omega-3 fatty acids, which are essential for good health.
  • You can use this oil over high heat, making it quite versatile for a number of cooking methods.

Cons

  • A large portion of canola oil available within stores is derived from genetically-modified (GM) crops. Should you use it within cooking, then I recommend selecting an Australian GM free version. It is not an oil I regularly use at home because there is a lot of controversy surrounding its use.
  • Canola oil can go rancid quite easily, so store in a cool, dark place.

Peanut Oil

Pros

  • This is another great one to cook over a high heat, as it has a high smoking point.
  • Peanut oil can be quite strong in flavour, and is well suited to Asian stir frys and similar dishes.
  • It contains heart healthy phytosterols (an essential plant fat) known to lower cholesterol.

Cons

  • As its name suggests, it is not so good for people with nut allergies.
  • Like most nuts and nut oils, peanut oil has a high energy content.

These are just some general facts about typical cooking oils. They all have a variety of uses when it comes to cooking. I always try to select the oil that is best suited to the cooking method and flavour of the dish. Regardless of your choice of oil, it is important to remember that they are quite calorie dense and therefore should be used in moderation. As I said, I am Greek and for me Extra Virgin Olive Oil is very typical and something I always have a lot of at home. For me, I am 100% confident in its health benefits therefore it is undoubtedly my most used oil.


Article from Kayla Itsines: http://www.kaylaitsines.com.

Kayla Itsines Total Body Workout

I have been doing Kayala Itsines By Kayla Itsines
Feb. 25, 2016
View step-by-step directions on each exercise here.

kayla-itsines-workout-for-motto

It’s perfect for beginners and fitness fanatics. I created this beginner-friendly workout specifically for Motto readers. It consists of two rounds of two circuits, each lasting seven minutes. Start by setting your timer for seven minutes, and aim to complete as many rounds of the exercises in Circuit 1 as you can before the timer goes off.

Once you’re done, take a 30-second break. Reset your timer to seven minutes, and do the same thing with Circuit 2.

Repeat Circuits 1 and 2 again for your full 28‐minute workout. While you’re aiming to complete each exercise as quickly as possible, remember that the most important thing is to maintain proper technique throughout.

Circuit 1 (upper body)
Commandos x 24 (12 per side)
Start by placing your forearms (wrist to elbow) on the floor and extending both of your legs behind you, resting on the balls of your feet (A). This is called a plank position. Release your left forearm, and place your left hand firmly on the floor directly below your left shoulder (B). Push up onto your left hand, followed immediately by your right in the same pattern (C). Ensure that you brace through your abdominals to prevent your hips from swaying. Return to plank position by releasing your left hand and lowering onto your forearm before doing the same with your right hand. Repeat this exercise, starting with your right hand. Continue alternating between right and left for 24 reps (12 per side).

Read more: Kayla Itsines Answers Once and for All: What’s the Quickest Way to Get Fit?

Lay-down push-ups x 15
Start by lying flat on your stomach, with arms extended out in front of you and legs straight behind you with feet slightly apart (A). Position your toes in toward the floor as shown. Bring your arms in toward your body, and position your hands on either side of your chest (B). Push through your chest, and extend your arms to lift your body into pushup position (C). Ensure that you maintain a neutral spine and stabilize your abdominal muscles throughout the entire movement. Slowly lower your body completely to the floor, and extend your arms out in front of you (A). Complete 15 reps.

Straight-leg sit-up + twist x 24 (12 per side)
Start by lying flat on the floor on a yoga mat with your feet extended out in front of you (A). Bend your elbows to place your hands behind your earlobes, and engage your abdominal muscles by drawing your bellybutton in toward your spine. Using your abdominals, slowly lift your head, shoulder blades and torso off of the floor. As you sit up, extend your right arm and twist through your torso to touch the floor next to your left leg (B). Slowly untwist, and release your torso backward and bring your right hand toward your ear (C). Repeat using your left hand (D). Continue alternating for 24 reps (12 per side).

Plank x 1 minute
JEREMY BUTLER
Start by placing your forearms firmly on the floor and linking your fingers together. Raise your hips and torso off of the ground, and rest on the balls of your feet, ensuring that your elbows are directly below your shoulders. Brace your abdominals, and ensure that your body remains in one straight line from head to toe for 1 minute.

Circuit 2 (lower body)
Reverse lunge + knee lift x 24 (12 per side)
Plant both feet on the floor slightly farther than shoulder-width apart (A). Carefully take a big step backward with your right foot. As you plant your right foot on the floor, bend both knees to approximately 90 degrees, ensuring that your weight is evenly distributed between both legs. If done correctly, your front knee should be aligned with your ankle and your back knee should be hovering just off of the floor (B). Extend both knees, and transfer your weight completely onto your left foot. At the same time, lift up your right foot and bring your knee in to your chest (C). Release your right leg from your chest, and place it back on the floor behind you. That’s one rep. Complete 12, then switch sides and do another 12 reps.

X hops x 24
Plant both feet on the floor slightly farther than shoulder-width apart. Looking straight ahead, bend at both the hips and knees, ensuring that your knees remain in line with your toes. Continue bending your knees until your upper legs are parallel with the floor (A). Ensure that your back remains somewhere between a 45- and 90-degree angle to your hips. This is called squat position. Propel your body upward into the air. Extend and reposition both of your legs to land in a lunge position, with your left leg forward and right leg back (B). Ensure that your weight is distributed evenly between both legs. Immediately propel your body upward into the air again. Extend and reposition both of your legs to land back into squat position (C). Immediately propel your body upward into the air again. Extend and reposition both of your legs to land in a lunge position, with your right leg forward and left leg back (D). Continue alternating between lunge and squat movements for 24 reps. (Each movement of the feet is equal to one rep.)

Burpees x 10
Bend both your hips and knees, and place both hands on the floor directly in front of your feet (A). Kick your feet backward so that your legs are completely extended behind you, resting on the balls of your feet (B). Transfer your body weight onto your hands, and jump your feet inward to land in a crouched position with your feet shoulder-width apart (C). Propel your body upward in one explosive movement, extending both your legs beneath you and your arms above your head (D). Land in a neutral standing position, ensuring that you maintain “soft” knees to prevent injury. Complete 10 reps.

Split squats x 10
Stand with both of your feet together on a step (A). This is your starting position. Bend your knees slightly, and propel your body upward into the air. Reposition your legs so that your feet land in a sumo (wide) squat position. Continue bending your knees until your upper legs are parallel with the floor, ensuring that your back remains somewhere between a 45- and 90-degree angle to your hips (B). Propel your body upward into the air again, and reposition your legs to bring your feet together. Land in a neutral standing position on top of the step, ensuring that you maintain “soft” knees to prevent injury. Complete 10 reps.

Kayla Itsines is a personal trainer from Adelaide, South Australia. She is known for her Bikini Body Training Guides and has a newly released fitness app, Sweat with Kayla.

Create a website or blog at WordPress.com

Up ↑